The following describes how to use a one-wire tether between a Target's C2 programming pin and the MIDE programmer. Construction, connection and use of MIDE processor is described in more detail in the manual for the MIDE MyForth Integrated Development Environment.
The MIDE manual also provides the details the operation of the C2 Tether, its use during routine development is not covered succinctly.
The MIDE manual shows various MIDE programmers built with AGEN Target Boards and 850 Toolstick boards. The current programmer uses a MINT (850) processor board and has a smaller footprint. This note shows this newer programmer hardware and describes its construction and use.
For ease of reference, the MIDE programming and tethering processor is called the "IPP" (InterPose Processor). This functional abbreviation refers more to the hardware than the function that it is performing (i.e., programming or tethering).
Page 2
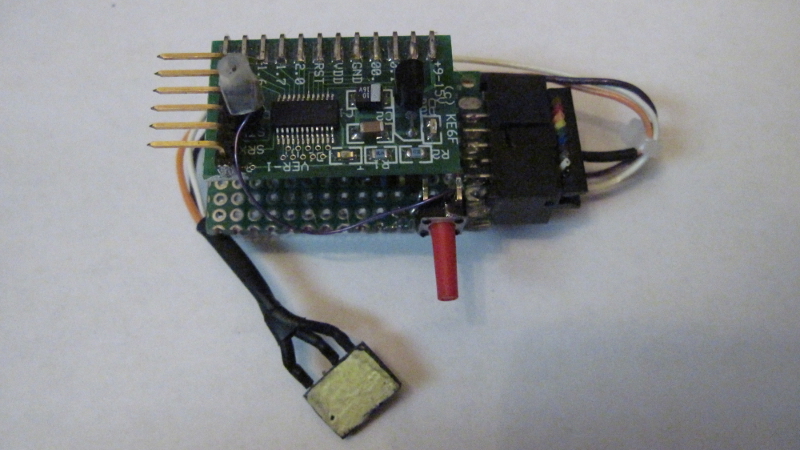
Photo 1 shows the current MIDE programming and tethering hardware. This programmer uses a MINT target board (a special-order standalone processor board). The MINT is mounted on a small piece of perf board with right-angle pins soldered to its edge connections. Built this way, the board is parallel to the perf board. The new MIDE programmer is much smaller than the versions shown in the manual for the MIDE MyForth Integrated Development Environment.
Many of our projects magnetically mount to a metal base plate during development (as shown in the MIDE cover photo). This allows flexible positioning of development modules while providing stable locations for easy interconnection and test. During development, most project boards mount to standoffs on a standard magnetic base that has a hole pattern that matches the perf boards we use.
Thus, project boards can mount on the magnetic bases during development and can be easily removed and re-mounted for final assembly.
In keeping with the magnetic mounting scheme, the current programmer has a magnet glued on the bottom of the perf board so that the programmer can be flexibly positioned in relation to other modules on the base plate.
Photo 1. New MIDE Programming/Tethering Hardware (IPP)
Page 3
Because tethered development may require rebooting of the MIDE tethering hardware, a reset switch is wired to the perf board base. This can be seen in the photo as the long red-handled pushbutton sticking out to the side.
The reset line is wired to the reset switch with a single-wire jumper (the purple wire). The jumper connects to the MINT board with a stake pin socket that mates with a single stake pin soldered to the reset connection near the BOBI interface pins.
This pin and socket connection allows the MINT board to be completely detatched perf board base when the MINT board is unplugged from its socket. Note that the socket on the reset wire is held in place with some clear heat-shrink tubing, which is visible on the top of the board. The target board detection resistors are mounted on the perf board.
There is a three-wire programming cable that connects to the Target for programming and tethering. This is designed to connect through the BOBI Interface on the Target. On the IPP end, these three wires are soldered to individual pins of a 2X5 socket. The socket plugs into a 2X5 shrouded IDC connector mounted to pads on the top and bottom side of the IPP's perf board.
The use of a 2X5 connector on the perf board base allows connection of a standard 10-pin ribbon cable in place of the three-wire cable, thus providing a direct connection to the Silicon Laboratories, Inc. (SL) Development Boards. The SL Development boards are typically programmed with the SL Debug Adapter and IDE. The straight-through ribbon connection allows Development Boards to be programmed by the MIDE programmer and also allows interactive test using the C2 tether.
Page 4
The following compilation conditions are required to use the C2 Tether:
Once the Target code has been compiled with the above changes, the programming file can be used to program the chip with the MIDE programmer (IPP).
After programming the Target, to start tethered operation, execute the "t.sh" shell script (this is usually aliased as "t" in .bash_aliases file). This script contains instructions on the tethering process so that you can easily refresh your memory on how the tethering works. The script brings up GForth, establishes serial communications with the IPP and compiles the Target application.
This is just the normal compilation procedure for the application. But, the "t" script does not exit after compilation: it provides a GForth command prompt that allows the following:
The decompilation commands, "see" and "decode" are discussed in the manual for the MyForth Reference Manual and are not covered here.
After compiling the application using "t", tethered execution can be started by entering the "targeting" command. This puts the IPP into the tethered mode, talking to the "tq" routine running on the Target. At the tethering prompt, you can execute ".ts" to verify that the Target tether is active. The response should be "empty" (in red text).
Page 5
Once the tether is established an verified, you can execute any routine on the Target, regardless of whether or not it was defined with a header for standalone operation. Thus, words defined with a "-:" prefix can be executed in addition to words defined with a ":" prexfix. Macros, of course, cannot be executed unless they are encapsulated in a "-:" or ":" definition.
There are some basic debug and test commands for the target. The most basic of these is ".ts" which displays the Target's stack.
Single and double numbers can also be put on the Target's stack. To put a single byte on the Target's stack, use the "#" command (e.g., "$45 #" to put hex 45 on the Target's stack). Use the "##" command to put a double number on the Target's stack (e.g., $1234 ##). Numbers can be verified with the ".ts" command.
A dump of Target memory is also available. With the start address on the Target's stack, executing "tdump" displays 256 bytes of the Target's memory. Photo 2 shows a dump of Target memory for the WIRE application, starting just after the start of program code at $0033 (rom-start). Note that the application name and revision string is shown.
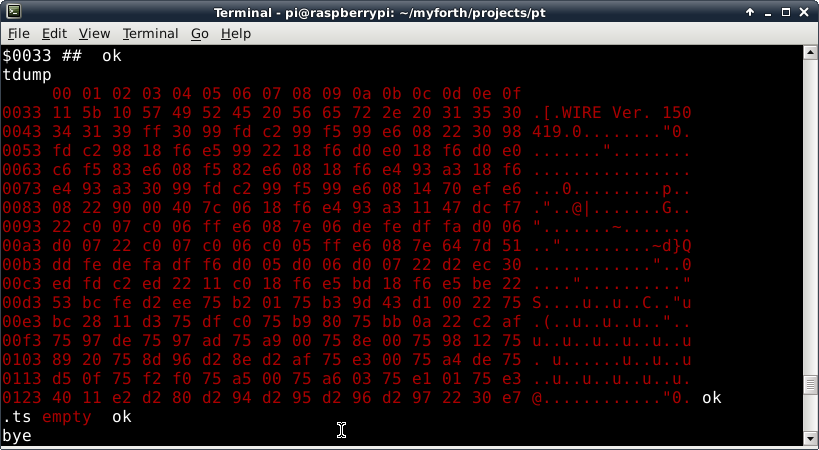
Photo 2. Tethered Target Dump
Page 6
The code for the "tdump" command can be used as an example of how to display information on the tethering link. For example, a special "txdump" command was developed for one application that dumps an xram buffer that accumulates ASCII responses from an attached processor. This special dump command was based on the "tdump" code.
Tethered operation is very useful when I/O is constrained and when the serial port is not available (i.e., you cannot test with the standalone interpreter). Also, when the serial port is used to communicate with another processor, it may not be readily available for debug and test.
Note that the tethered link can be used to send characters to the serial port, eliciting a response from an attached processor. By capturing serial responses to xram, tethering can provide an easy way to exercise and debug a serial link.
During tethered operation, execution of some words will, of course, generate errors. These errors will often kill the tether. To recover, cycle power to the Target (or reset it) and reset IPP. In some cases, only a reset of the IPP is needed: it times out after not receiving a response from the Target after two seconds. You can change this timeout in the c2tether.fs code if an operation takes longer than this (e.g., a long dump at a slow baud rate).
A reset of the Target is not needed if you are going to immediately reprogram the Target; the programmer resets the Target after programming.
You can exit from the tethering interface on the PC by entering "bye" at the targeting prompt. You can also exit from tethering and go back to the decompilation and test mode by entering "posing" while in the "targeting" mode. To resume the tether from the "posing" mode, again execute the "targeting" command.
Another option is to exit from tethering by entering "bye": this exits to the bash shell. Such an exit does not affect the operation of the tethering code on the Target (it never times out): you can resume tethered operation by re-entering the "t" command, followed by the "targeting" command. Because the Target typically starts up executing its tether in the turnkey "go" command, the Target tether is available when the Target is reset (e.g., due to power up or at the end of programming).
Page 7
During development we use the Raspberry Pi to perform fast programming using its hardware serial port. In this configuration, the IPP and Target are connected at the Raspberry Pi. For programming, we use a batch script to copy application files to the Pi so that they can be compiled on the Pi (i.e., using SSH).
Tethering can also be performed remotely by using a modified version of the tethering script.
Figure 1 shows the contents of the "t" script used to start test or tethering on the Raspberry Pi. Except for a com port change, there are few differences from the "t" script running on the Host PC. Normally, the application compiled on the Pi is used to program the Target. Afterward, entering "t", followed by "targeting" at the GForth prompt will start up remote tethering via the Pi.
Page 8
     1	#!/bin/bash
     2	# t.sh -- 150430rjn
     3	#
     4	# This script is used for C2 (one-wire) tethering using the Pi.
     5	# It is essentially the same as t.sh to compile an application but it
     6	# is customized for running on the Pi (e.g., com? is 3).  Note that
     7	# the script exits at the Gforth prompt to decompilation and tethering.
     9	#
    10	# DECOMPILING
    11	# After compiling the system is at a GForth prompt, ready to execute "see"
    12	# for decompilation. To decompile starting at a specific address,
    13	# use something like "$0033 decode."  Exit back to the console with "bye."
    14	#
    15	# TETHERING
    16	# Executing "tethering" at the MyForth prompt establishes the tether
    17	# to the Target chip's C2 pin.
    18	# Tethering code must be compiled on the Target and the "go" word changed
    19	# to do Target quit: -: go  init tq
    20	# In the tethered mode, you can execute Target words and the following:.
    21	#     .ts -- display the Target's stack
    22	#   tdump -- target dump (dump address must be on Target stack)
    23	#       # -- put a byte on the Target's stack
    24	#      ## -- put a double number (e.g., adr for tdump) on the Target's stack
    25	#
    26	# POSING
    27	# Exit the tethering mode by entering the "posing" command.
    28	# This puts the system back at the GForth prompt, ready for
    29   # for execution of the decompiler commands).
    34	#
    35	# Some tethering errors can hang up the Target.  One indication of a
    36   # hangup is that an attempt to program results in "NO TARGET FOUND"
    38	# To correct this, press the reset switch on the IPP or cycle power to it.
    39	# The Target is reset after programming.
    40	#
    41	#   /usr/bin/gforth-0.7.0 \
    42	gforth \
    43	   -e "fpath path+ ./ " \
    44	   -e " 3 value com? " \
    45	   -e " 19200 value current-baudrate " \
    46	   ./serial-linux.fs \
    47	   -e " open-comm"  ./job.fs
Figure 1. Tethering Script for the Raspberry Pi
Page 9
Page 10
Initial Release |
Copyright © April 2015, Bob Nash.