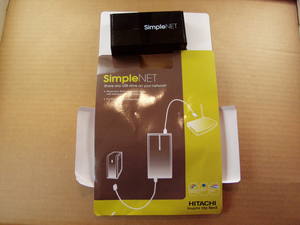
The small unit out of the package
For some time now I have been trying to find a source for embedded controllers with a price point well under $100. Last week I saw an add for a Hitachi SimpleNet NAS device on sale for $60 - down from the normal $80. It comes with two USB Host ports which is one of my minimum requirements. Ideally with Host USB ports, the device can talk to any number of other systems, such as USB drives as well as data sampling systems.
So what do you get? Not much as far as size and connectors, the whole product is really the NAS software. The unit is less than 2 by 4 inches in size, has two USB ports on one end, and the power and cat 5 connector on the other end. The product comes with a small CDRom containing all the docs, the power supply brick and a 18 inch cat 5 cable. When powered up, go to your web browser and connect to it using your networks DNS assigned IP addresses. You will get a password protected web page, use "admin" "admin" and your at the control screen. All this and more is covered in the docs on the CDRom.
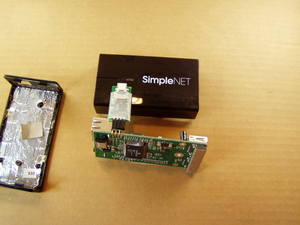
At this point I want to know more than software information and so I take it apart. There are no screws, it is a snap together shell that has been glued as well. So opening the unit will break the warranty and a couple of the retainers as well. When open you see the few items on the board - mainly the sockets and the DDR Ram. Take a small screw out and the board can be removed from the bottom part of the clam shell. Note the foil liner on the shell, it is the important heat sink that is contacted by a foam heat transfer pad on the cpu.
It is important at this point to indicate the importance of the heat transfer pad and how very easily it can be made useless. If you try to peel it back from the CPU as I did, kiss it off and just toss it away. I tried re-using mine and basicaly the unit got very hot and when re-inspecting the pad, I could see how it was coming apart and no longer worked. So care is needed working on the unit, or you can do as I did and use a big heatsink - more on that later.
The reason to remove the pad was to see what the cpu chip is - it is a CNS2132-250FP128-AEFF-G. Searching the web provided the real facts, which are: STAR/Cavium Networks ARM922 device with MMU running at 250Mhz, in a PQFP 128 pin package and is RoHS6 compliant. It has a normal set of functions, Network support, lots of I/O, and several USB ports. It has a built in DDR ram controller and thus uses a 32MB by 16bit SDRAM chip for memory. I think it boots from an 8MB SPI flash device, but haven't really gone that deep yet. What I did see however and went digging for is the "JP1" on the edge of the board - is it a UART, JTAG, or USB device port.
At this point I now have a basic understanding of the stock device. It would appear to work well as NAS device and may have possiblilty to work as an embedded controller. A big plus is the stock SSH feature which could allow you to log in and run programs from a mounted drive. A bit awarkward to do, but in it's standard format, you can do more than only NAS activites without any real hacking. I think overall that is pretty nice of them to provide the "SSH" feature. In doing some snopping around it appears to have plenty of free ram to run other programs, just not sure about needing or getting root access.
The next question - can it be hacked - appears to be yes. Two things are needed to be able to convert a system from one use to another. To work - you need to be able to change the software and talk to the system - this can do both. The normal NAS software does have an update mode, and thus you could update the software using that method. The problem I see there is having your software continue to update any changes. What you really want is some lower level method, and as I learned using buildroot you want it to boot not from flash but from a tftp/nfs mount point. This requires for an ARM chip uboot in flash and a means to talk to the uboot.
When searching the web, I found cnuser.org, a support site for users of the Cavium Network chip sets. After joining the group and agreeing not to leak any factory secrets, I got access to both the chip information and the standard software tools to use on their development test board. From that I was able to see that they use uboot 1.1.4 and buildroot - two important features to start making changes with. The next question then was access to the uboot prompt.
I was able to down the layout and schematic for the dev board, but unable to see the schematic or board layout due to not having a current version of OrCad. I was able however to use gerbv, or a linux gerber viewer to see the different layers of gerber files provided in case you want to create your own boards. From those I could see how they talked to the unit - serially. I then ohmed out the lines from the boards JP1 - the four solder pads on the bottom side of the board next to the cat5 connector. Pin 1 was ground, pin 2 was 107 or TxD, pin 3 was 108 or RxD, and pin 4 Vcc. No devices between these, so this is a ttl level serial interface.
I have been down this route before and thus I soldered a rt angle 3 pin header to JP1. I have from previous projects a Parallax USB to Serial adapter that works with 3 to 5 v signals. One end of the adapter has sockets that will slide over the header pins correctly without needing the Vcc pin. I tested the unit with this configuration and after setting minicom to 38400/8/n/1 and rebooting the SimpleNET - don't forget the hitting of space key several times - I got the standard uboot boot up message. A few more trys and I got "hit space to cancel boot" message. I was in at that point.
At this point I hope I have given others enough information to do their own investigation of the SimpleNET board. I need to finish the buildroot computer corner and thus refresh myself on how it works, before tackling this projects buildroot. I can see as well that my NGW100 article is not complete and thus I have some catching up to do before attacking this new project. However, I found the SimpleNET closer to what I want and thus will try and finish my other projects as fast as possible so I can dig deeper into it.
What I need from readers is a review of this article and any comments you might have. One sticking point I ran imto last time was deciding on what makes a complete dev system on the board. By that I means, how many and which programs to include in a dev version of the updated system. I tried building gcc under buildroot, but got too many errors as well as knowing there may not be enough ram for compiles. Under embedded Forth you can always extend the library and add new features, but under linux what tools do the same - TLC or Perl, or maybe GForth? Got any ideas?
I was able to do this due to many years of building embedded systems, and recent work on the Atmel NGW100. My CCII#7 article explains all about the NGW100 and using uboot. The article is missing information on updating uboot itself, but will be filled in soon. The CCII#8 on buildroot is still hardly started and with this new device clearly needs to be done next, as I figured out how to add a complete new project some time ago.
What follows now is a few pictures to show you what I did and the text that I got from the uboot interaction. I might say that the chip is a CNS2132, but all the software says it is a STR8131, which is wrong but OK. I figured the dev team had a 8131 dev board for creating the SimpleNET and since the main difference between a 31 and 32 is the USB device port, which is not used by SimpleNET, makes the software the same for both devices. I did check and a 32s UART port pins are 107 and 108 - which unless I counted wrong - are where JP1 went to. The 31 part UART pins are 108 and 109 and thus can be used to define the two parts.
Here are some Pictures of what you get out of the box:

The small unit out of the package
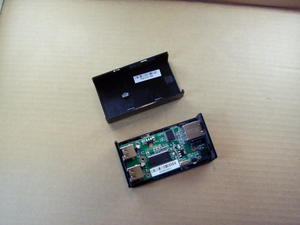
Two clam parts and board - broke off two of the glued plastic clips.
Here is the board out of the box and a view with the conductive pad removed.
Note the chip is a Cavium Networks CNS2132.
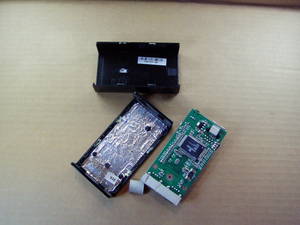
Board turned over after removing screw and pad.
Here are sone pictures of JP1 with header attached:
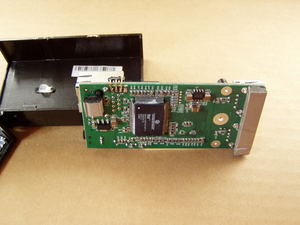
Header pins soldered in place - only three.
Parallax USB2SER device installed.
Here are pictures of my running setup - it runs very cool with the over sized heat sink.
I tried the smaller red heat sink from an old mother board - but it ran too hot even
with it. The big unit is over kill, but it stays put on my desk now.
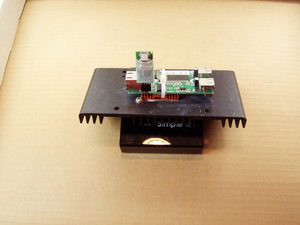
The small heat sink was not enough.
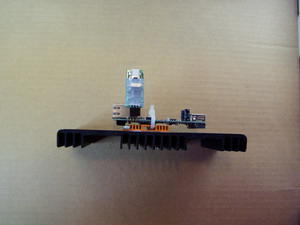
Note the wrap holding it in place.
Here is my normal working setup:
Here is what you get from uboot during a normal NAS startup:
U-Boot 1.1.4 (Mar 16 2009 - 12:42:53)

U-Boot code: 00000000 -> 0001A3E8  BSS: -> 0001F32C
IRQ Stack: 00e6ff7c
FIQ Stack: 00e6ef7c
RAM Configuration:
Bank #0: 00000000 32 MB
Flash Manufacturer: MX
Flash:  8 MB
DataFlash: MX 25L64
Page Count: 32768
Page Size: 256
Size: 8388608 bytes
Logical Address: 0x30000000
Area 0: 30000000 to 3002FFFF
Area 1: 30030000 to 3003FFFF
Area 2: 30040000 to 3023FFFF
Area 3: 30240000 to 307FFFFF
*** Warning - bad CRC, using default environment

In:    serial
Out:   serial
Err:   serial
PLL clock at 250MHz
CPU clock at 250MHz
AHB clock at 125MHz
APB clock at 62MHz
Hit any key to stop autoboot:  0
## Starting application at 0x01000000 ...
Uncompressing Linux............................................................................................................... done, booting the kernel.
Linux version 2.6.16-star (root@flash) (gcc version 3.4.6) #319 Sun Jun 14 15:01:05 CST 2009
CPU: FA526id(wb) [66015261] revision 1 (ARMv4)
Machine: STAR STR8131
Warning: bad configuration page, trying to continue
Ignoring unrecognised tag 0x00000000
Memory policy: ECC disabled, Data cache writeback
CPU0: D VIVT write-back cache
CPU0: I cache: 8192 bytes, associativity 2, 16 byte lines, 256 sets
CPU0: D cache: 8192 bytes, associativity 2, 16 byte lines, 256 sets
PLL clock at 250MHz
CPU clock at 250MHz
AHB clock at 125MHz
APB clock at 62MHz
Built 1 zonelists
Kernel command line:
PID hash table entries: 512 (order: 9, 8192 bytes)
Dentry cache hash table entries: 16384 (order: 4, 65536 bytes)
Inode-cache hash table entries: 8192 (order: 3, 32768 bytes)
Memory: 64MB = 64MB total
Memory: 61312KB available (2272K code, 497K data, 764K init)
Mount-cache hash table entries: 512
CPU: Testing write buffer coherency: ok
NET: Registered protocol family 16
PCI clock at 33M
PCI: bus0: Fast back to back transfers disabled
PCI Bridge found
PCI map irq: 00:00.00 slot 0, pin 1, irq: 0
SCSI subsystem initialized
usbcore: registered new driver usbfs
usbcore: registered new driver hub
LED init...
NetWinder Floating Point Emulator V0.97 (extended precision)
squashfs: version 3.3 (2007/10/31) Phillip Lougher
NTFS driver 2.1.26 [Flags: R/W].
JFFS2 version 2.2. (NAND) (C) 2001-2003 Red Hat, Inc.
Initializing Cryptographic API
io scheduler noop registered
io scheduler cfq registered (default)
str8131_rtc.o: rtc module version 1.0.0
Serial: 8250/16550 driver $Revision: 1.90 $ 2 ports, IRQ sharing disabled
serial8250: ttyS0 at MMIO 0x78000000 (irq = 9) is a 16550A
serial8250: ttyS1 at MMIO 0x78800000 (irq = 10) is a 16550A
RAMDISK driver initialized: 16 RAM disks of 8192K size 1024 blocksize
loop: loaded (max 8 devices)
Star NIC Driver(for Linux Kernel 2.6) - Star Semiconductor
    rxring.vir_addr=0xFFC00000 rxring.phy_addr=0x03D80000
    txring.vir_addr=0xFFC01000 txring.phy_addr=0x03D81000
Star Internal PHY
MAC Addr: 08:0a:0b:0c:0d:0e

star_nic_init_module: internal phy patch included.
star_nic_init_module: scatter/gather enabled.

STR8131 SPI: init
m25p80 spi1.0: m25p64 (8192 Kbytes)
Creating 5 MTD partitions on "m25p80":
0x00000000-0x00800000 : "all"
0x00000000-0x00040000 : "ARMBOOT"
0x00040000-0x00240000 : "Linux Kernel"
0x00240000-0x00780000 : "MTD Disk1"
0x00780000-0x00800000 : "MTD Disk2"
str8131-ehci str8131-ehci: str8131-ehci
str8131-ehci str8131-ehci: new USB bus registered, assigned bus number 1
str8131-ehci str8131-ehci: irq 24, io mem 0xcc000000
str8131-ehci str8131-ehci: USB 0.0 started, EHCI 1.00, driver 10 Dec 2004
usb usb1: configuration #1 chosen from 1 choice
hub 1-0:1.0: USB hub found
hub 1-0:1.0: 2 ports detected
ohci_hcd: 2005 April 22 USB 1.1 'Open' Host Controller (OHCI) Driver (STR8131)
str8131-ohci str8131-ohci: str8131-ohci
str8131-ohci str8131-ohci: new USB bus registered, assigned bus number 2
str8131-ohci str8131-ohci: irq 23, io mem 0xc4000000
usb usb2: configuration #1 chosen from 1 choice
hub 2-0:1.0: USB hub found
hub 2-0:1.0: 2 ports detected
usbcore: registered new driver usblp
drivers/usb/class/usblp.c: v0.13: USB Printer Device Class driver
usbcore: registered new driver usbtest
i2c /dev entries driver
str8131_i2c_dev_init: i2c module version 1.0.0
str8131_i2c_init: current_clock=400000l, CLKDIV=77
str8131_int28vbus_inthandler_init:
NET: Registered protocol family 2
IP route cache hash table entries: 1024 (order: 0, 4096 bytes)
TCP established hash table entries: 4096 (order: 2, 16384 bytes)
TCP bind hash table entries: 4096 (order: 2, 16384 bytes)
TCP: Hash tables configured (established 4096 bind 4096)
TCP reno registered
TCP bic registered
NET: Registered protocol family 1
NET: Registered protocol family 17
NET: Registered protocol family 15
NET: Registered protocol family 5
Freeing init memory: 764K
fuse init (API version 7.8)
fuse distribution version: 2.7.4
MAC Addr: 00:40:d0:13:c3:48
eth0:star_nic_lan_open
star_nic_enable: starting patch check.
Initializing USB Mass Storage driver...
usbcore: registered new driver usb-storage
USB Mass Storage support registered.
usb 1-2: new high speed USB device using str8131-ehci and address 2
usb 1-2: configuration #1 chosen from 1 choice
scsi0 : SCSI emulation for USB Mass Storage devices
  Vendor: BUFFALO   Model: External HDD      Rev:
  Type:   Direct-Access                      ANSI SCSI revision: 02
SCSI device sda: 976773168 512-byte hdwr sectors (500108 MB)
sda: Write Protect is off
sda: assuming drive cache: write through
SCSI device sda: 976773168 512-byte hdwr sectors (500108 MB)
sda: Write Protect is off
sda: assuming drive cache: write through
 sda: sda1
sd 0:0:0:0: Attached scsi disk sda
sd 0:0:0:0: Attached scsi generic sg0 type 0
Replace OK!
Here is the screen from uboot when you get out of autoboot mode:
U-Boot 1.1.4 (Mar 16 2009 - 12:42:53)

U-Boot code: 00000000 -> 0001A3E8  BSS: -> 0001F32C
IRQ Stack: 00e6ff7c
FIQ Stack: 00e6ef7c
RAM Configuration:
Bank #0: 00000000 32 MB
Flash Manufacturer: MX
Flash:  8 MB
DataFlash: MX 25L64
Page Count: 32768
Page Size: 256
Size: 8388608 bytes
Logical Address: 0x30000000
Area 0: 30000000 to 3002FFFF
Area 1: 30030000 to 3003FFFF
Area 2: 30040000 to 3023FFFF
Area 3: 30240000 to 307FFFFF
*** Warning - bad CRC, using default environment

In:    serial
Out:   serial
Err:   serial
PLL clock at 250MHz
CPU clock at 250MHz
AHB clock at 125MHz
APB clock at 62MHz
Hit any key to stop autoboot:  0
Star Equuleus #
Star Equuleus # ls
Unknown command 'ls' - try 'help'
Star Equuleus # help
?       - alias for 'help'
autoscr - run script from memory
base    - print or set address offset
bdinfo  - print Board Info structure
boot    - boot default, i.e., run 'bootcmd'
bootd   - boot default, i.e., run 'bootcmd'
bootm   - boot application image from memory
bootp   - boot image via network using BootP/TFTP protocol
cmp     - memory compare
coninfo - print console devices and information
cp      - memory copy
crc32   - checksum calculation
echo    - echo args to console
erase   - erase FLASH memory
flinfo  - print FLASH memory information
go      - start application at address 'addr'
help    - print online help
iminfo  - print header information for application image
imls    - list all images found in flash
itest   - return true/false on integer compare
loadb   - load binary file over serial line (kermit mode)
loads   - load S-Record file over serial line
loop    - infinite loop on address range
md      - memory display
mm      - memory modify (auto-incrementing)
mtest   - simple RAM test
mw      - memory write (fill)
nfs     - boot image via network using NFS protocol
nm      - memory modify (constant address)
pci     - list and access PCI Configuration Space
printenv- print environment variables
protect - enable or disable FLASH write protection
rarpboot- boot image via network using RARP/TFTP protocol
reset   - Perform RESET of the CPU
run     - run commands in an environment variable
saveenv - save environment variables to persistent storage
setenv  - set environment variables
sleep   - delay execution for some time
tftpboot- boot image via network using TFTP protocol
version - print monitor version
Star Equuleus # printenv
bootcmd=go 0x1000000
bootdelay=1
baudrate=38400
ethaddr=00:aa:bb:cc:dd:10
ipaddr=192.168.100.253
serverip=192.168.100.254
netmask=255.255.255.0
cpu_clock=250
stdin=serial
stdout=serial
stderr=serial

Environment size: 199/65532 bytes
Star Equuleus #
Here are some usefull links:
Hitachi SimpleNET/SimpleTech home page
Cavium Networks Home Page look for ECONA devices.
cnusers.org - Cavium Networks Support web pages must join to get source files.
Buildroot home pages - buildroot information and home page.